

Update 25th August, 2017: I haven’t tried this method yet on the recently released Raspbian Stretch version. However, one user has confirmed that the first method works on it. If it works for you, please let us know through the comments. Thanks.
Update 29th Dec, 2016: If you’re using the latest PIXEL Image, please make sure you enable the SSH Server by placing a a file named as ssh in the boot directory before trying any of the following methods. The SSH Server on boot has been disabled in the latest Raspbian image as a security measure. Read more about it here: https://www.raspberrypi.org/blog/a-security-update-for-raspbian-pixel/
Update 9th July, 2016: I’m inspired by this method https://www.raspberrypi.org/blog/programming-pi-zero-usb of SSHing into a Pi through the USB only and gonna tinker and see if we can get to also share Internet over to the Pi using only the USB. (No more messy LAN Cable 🙂 ). If you get it working, please share.
Update 10th July, 2016: I’m afraid, I won’t be able to get the above method running on a Pi 2/3 as it’s only supposed to work on a Pi Zero. If you have a Pi Zero and are interested in Sharing WiFi over USB, please check out http://blog.gbaman.info/?p=791#comment-136336
Updated 5th April, 2016 with Striner’s method
.
If this Tutorial helps you, please consider PayPaling me any positive integer at http://paypal.me/anwaarullah
This post will allow you to share WiFi Internet connection of the PC/Laptop with the Raspberry Pi which are connected to each other through a simple LAN/Ethernet cable connection at each end.
What you want to do:
- Share PC/Laptop’s WiFi Internet connection with Raspberry Pi through LAN/Ethernet connected to Raspberry Pi
What you have:
- Raspberry Pi B/B+/Pi 2/Pi 3 (If you’ve a Pi Zero, please try and let us know if this works on a Zero. I haven’t got a Pi Zero yet) running the latest Raspbian Wheezy. (I’ve not yet tried it with recently released Raspbian Jessie based off Debian 8. If you’ve been successful with this latest release, please post in the comment and I’ll update it here. Thanks.)
- PC/Laptop with WiFi Internet connection and a Ethernet Jack (LAN Connector / RJ45)
A working SSH connection with Raspberry Pi (direct access, explained here)Not required if using Striner’s or Bridge.
What you don’t have:
- Display Device for the Raspberry Pi (HDMI enabled display unit / Old TV)
- Direct Internet connection for the Raspberry Pi (LAN or WiFi)
Extra Stuff you need:
- Standard Network Cable (Cat 5, Standard or Crossover)
- PutTTY Software (will be used to SSH into the Pi)
- SD Card Writer
The easiest way to go around Sharing WiFi with Raspberry Pi is to follow Striner’s method of Sharing WiFi with the Raspberry Pi.
I’ve tested it with Raspberry Pi 3 and Windows 10 and he’s tested it on Win 8.1 and an earlier Pi and should work will Raspberry Pi B/B+/Pi 2/Pi 3. This hasn’t been tested with Win 7, though it mostly should work. Please give a shoutout and let us know if you’ve tried on Win 7 and it works.
Method 1: Striner’s Method
Tested On: Windows 10 & Raspberry Pi 3 & Pi B (the Yellowish RCA model 😉 )
Known to work on: Windows 8/8.1 & Raspberry Pi B/B+/Pi 2
Not tested (yet) on: Windows 7 & Raspberry Pi B/B+/Pi 2/Pi 3
1.1 Open up the Network and Sharing Center settings and navigate to Change Adapter Setting
 1.2 Right click on the Wireless Adapter and hit Properties
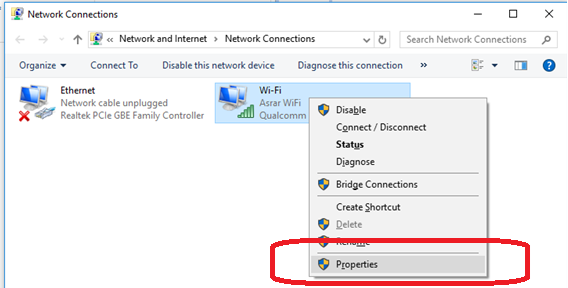 1.3 Navigate to the Sharing Tab and select the Allow other network users to connect through this computer’s Internet connection checkbox
 1.4 Now right click the Lan Adapter and hit Properties. Double click the IPV4 option and verify that some dynamic IP is populated (192.168.137.1 in my example)


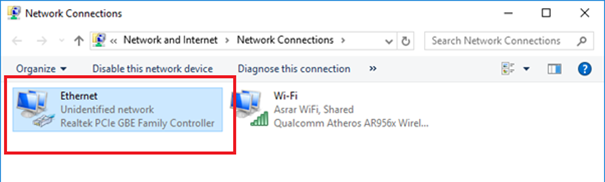
1.5 Now Power ON the Raspberry Pi (ignore if already powered ON :P) and connect one end of the LAN Cable to the Raspberry Pi and the other end to the PC. You should be able to see status messages Identifying… and eventually Unidentified network

1.6 Open up cmd prompt and type in:
ping raspberrypi.mshome.net
You should be able to ping the Raspberry Pi:

1.7 Open up Putty and set the Host Name as: raspberrypi.mshome.net and hit connect. (You can also use the IP address of the Pi revealed in the above ping prompt: 192.168.137.149)

1.8 You should be able to see the login prompt. Hit pi and raspberry and Enter

1.9 You can now
ping www.google.com
(or any other website) from within the Shell and you’ll have response messages. Congratulations! Your Pi now is connected to the World Wiiiiiiide Web 😉

Testing apt-get

Big Thanks to Danny Striner, who shared this method in a comment and tested it out. Full credit goes out to Striner. I’ve named this method as the “Striner’s Method” to honor him 🙂
P.S: If you run into issues trying out this method, please disable windows firewall and try again (as pointed out by some users in the comments).
Method 2: Using Network Bridging
Edit: [12:58AM IST, 1 Feb, 2016]: I just stumbled upon a super simple process of Bridging the connections and directly ping and access Internet on the Raspberry Pi without having to edit anything on the SD Card’s cmdline.txt file.
Tested On: Windows 7 & Raspberry Pi 2
Known to work on: Windows 7/8/8.1 & Raspberry Pi B/B+/Pi 2/Pi 3
Not tested (yet) on: Windows 10 & Raspberry Pi B/B+/Pi 2/Pi 3
This process worked flawlessly for me and I’ve wrote a detailed tutorial here: https://www.hackster.io/Anwaarullah/sharing-wifi-with-raspberry-pi-using-a-lan-cable-ae1f44
If this doesn’t work, please follow Method 3 below.
Method 3: Editing cmdline.txt file of Raspberry Pi SD Card
Tested On: Windows 7 & Raspberry Pi B/B+/Pi 2/Pi 3
Known to work on: Windows 8/8.1 & Raspberry Pi B/B+/Pi 2/Pi 3
Not tested (yet) on: Windows 10 & Raspberry Pi B/B+/Pi 2/Pi 3
Edit: 2nd Jan, 2015. Added Video Tutorial:
A large part of this post assumes you’ve read the earlier post on directly accessing the shell on Raspberry Pi through a Ethernet/LAN connection. In this post, we’ll go about setting up the Raspberry Pi to access internet through the RasPi’s Ethernet/LAN port from a Laptop/PC’s shared WiFi connection.
Method 3 Steps:
- Firstly, enable the WiFi adapter of the PC/Laptop and make sure it’s connected to a WiFi hotpspot. Open any Internet Browser and confirm internet access by opening any website.

Note: I’m using my Android device (Nexus One) configured as a WiFi hotspot J
- Now, go to Network and Sharing Center (Network Settings in Win XP) and then head to the Change Adapter Settings page. As shown below, we’re connected to ‘Wireless Network Connection’ on ‘Android 4’. Do remember the ‘Local Area Connection’ to which we’ll eventually share this connection

- Now, right click the above Network → Properties and then select the Sharing tab
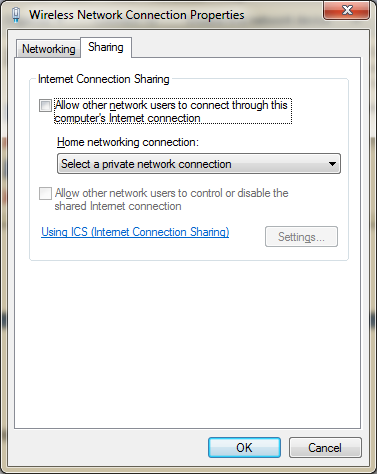
- From the drop down list, choose ‘Local Area Connection’ and enable both the checkboxes and hit OK. Once done, head back to the Adapter Settings page and you should now see the Shared info message on the Wireless Network Connection


- Now, right click ‘Local Area Connection’ → Properties and then select Internet Protocol Version 4 and then click the Properties Button

Once the properties tab pops up, make sure that the ‘Obtain IP address automatically’ checkbox is selected. If not, check it and hit OK

- Now, power up the Raspberry Pi (making sure that the Ras-Pi and the Laptop/PC are connected to each other through the LAN/Ethernet cable) and wait a minute or two while the Ras-Pi boots. Now, repeat step 5 (previous one) to make sure ‘Obtain IP Address Automatically’ is still checked.
- Open up command prompt using the hotkey Windows Key + R and then typing in cmd or simply keying in cmd in the start menu (Win 7)
- In the command prompt, key in ipconfig and scroll to the top of the info shown

Note the IPv4 address which is 169.254.39.68 in this example. Please make a note of what you see as this will be required further.
- Now, power off the Raspberry Pi and plug the Ras-Pi’s SD card into a card reader and connect it to the PC. Once the disk opens up, open the cmdline.txt file in any editor

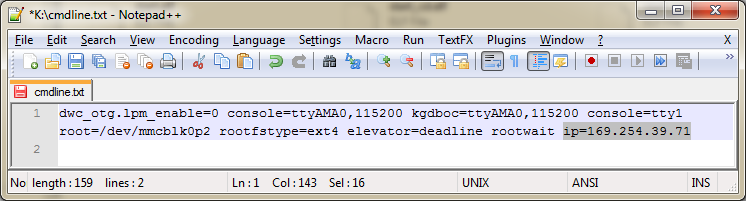
You’d probably have an entry as ip=169.254.39.71 which we set up in our previous post
- Now, to this entry, append the IPv4 which we got earlier preceded by two colons as shown below:
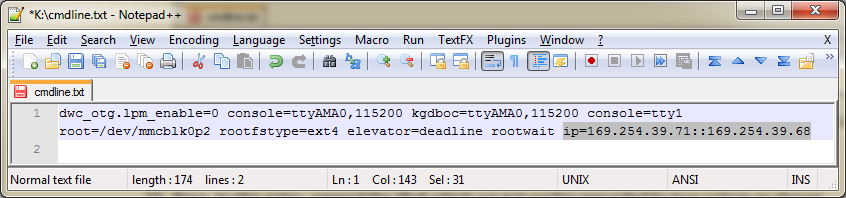
where the first half is the static IP for Raspberry Pi (169.254.39.71) and the other half is the IP of the IPV4 or Ethernet Adapter (169.254.39.68) which we obtained earlier.
- Save this file and plug the SD card back into the Raspberry Pi. Power up the Raspberry Pi and wait for a min or two. Establishg a direct SSH connection with the Raspberry Pi as explained in the previous post.
- Now, to verify if our Ras-Pi is Internet-Connected, type in this command in the Shell (PuTTY terminal connected to the Ras-Pi)
and you should see response from the servers as shown below:

Voila!!! Your Raspberry Pi is now connected to the World Wide Web 🙂
- Going one step further, lets direct access the Raspberry Pi’s desktop and open up the midori browser. Verify Internet connectivity on the Ras-Pi by opening any website.

Note (Edited: 5th Feb, 2015): Midori browser is no longer coming pre-installed with the latest Raspbian version and has been replaced with Epiphany Browser. Please use that instead to verify internet connectivity.
Method 4:
Check out the comments. Many users have shared their own techniques which work on Win 8/10 flawlessly.
Please let me know your feedback or questions through comments.
Thanks 🙂
References:
- http://pihw.wordpress.com/guides/direct-network-connection/super-easy-direct-network-connection/
- https://anwaarullah.wordpress.com/2013/07/16/direct-access-raspberry-pi-shell-and-desktop/
P.S: Did this post help you? Please leave your feedback. If you’ve tried some additional steps that helped you in getting this working, please share so we all can benefit from.
If you’ve benefited from this post, please consider donating and help me buy new development stuff and create new tutorials/resources. Thanks!


I dont have a drop-down list in the sharing tab, i completed the tutorial up until using ping, and the response is unknown host
I also faced this issue recently but don’t remember why it occurred and what I did to resolve it 😦 Do you have admin rights on your PC?
I am also running windows 10
Hmmm. I haven’t moved to Win 10 yet so can’t debug it at my end. Can you try bridging the connections instead of sharing them?
yes
i have admin rights
Have you made sure that the Obtain IP Automatically radio button in the LANs Network Setting is set to Automatic after enabling the Share feature of the WiFi adapter?
yes, the radio is set to obtain the ip automaticly
In point 5, you say “Obtain IP address automatically” has to be checked. For me, it worked the other way around.
I already had “Obtain IP address automatically” checked for Ethernet connection. But when I enabled Internet sharing on my Wifi connection (sharing with Ethernet connection), the “Obtain IP address automatically” checkbox automatically got unchecked for my Ethernet connection. I noted down the static IP allocated to it (192.168.137.1), allocated an IP to my pi accordingly (192.168.137.3) and it worked! I can connect to Internet on Pi now.
Thanks for mentioning that approach. I’ve been thinking to redo the tutorial keeping the recent errors some folks have been encountering.
hi,i followed all the methods,as u said,but am unable to ping http://www.google.com..its showing unknown host.
i am using raspberry pi 2 model b(2015-05-05-raspbian-wheezy.img) and window 7.i got the gui for raspberry pi with startlxde command..why ‘startx’,’lxsession’ command is not working.’sudo apt-get update’ command is also showing error.
startx will work when you have a standard o/p device/monitor connected to the Pi.
Hello Anwaarullah, I can’t find cmdline.txt in my SD card. What should I do?Tq in advance 🙂
Are you using the NOOBS image? This method doesn’t work on NOOBS and you’ve to flash Raspbian.
really a nice video. Thanks ANWAARULLAH I got my pi working..i followed so many other videos but this one is the best 🙂
Glad it worked 🙂
I also had the same problem of unable to share the net connection from Windows 8.1 to Raspberry Pi. After many trials I could manage to get the connection.
Added the public dns servers into /etc/resolv.conf as below (sudo nano /etc/resolv.conf)
nameserver 8.8.8.8
nameserver 8.8.4.4
After performing ICS related suggestions explained in the earlier threads, I could get the default PC IP 192.168.137.1
Added a static IP to Raspberry Pi in /etc/network/interfaces (sudo nano /etc/network/interfaces) as below:
auto eth0
iface eth0 inet static
address 192.168.137.2
netmask 255.255.255.0
network 192.168.137.0
broadcast 192.168.137.255
gateway 192.168.137.1
Added the below change at the end of /boot/cmdline.txt (sudo nano /boot/cmdline.txt)
ip=192.168.137.2::192.168.137.1
Even with these changes I was not lucky enough to get the connectivity several times.
Did one last try as below:
The Raspberry Pi was connected and the Ethernet card was intact. Then once again pressed the OK button on the ICS (Sharing the internet connection) and then performed a disconnect and connect on the dial up. Now when I checked the ping http://www.google.com it worked. Thank God.
So it looks to be something to do with the sequence matters. Thought it might help someone.
Thanks Ebith for sharing your process. If you don’t mind, can I edit my post and include your process (with full credits to you) as one of the alternative techniques that work?
hai anwaarullah,
i’m using win 7 with ip address router HUAWEI E5372 169.254.160.1, ip address ISP 112.xxx.xxx.xxx, and ip address raspi2 169.254.160.71. i’m also using subnetmask 255.255.0.0.
i have to follow all instruction from this post, but i can’t ping http://www.google.com.
please help me because i have to finishing my exam. T_T (crying).
sanpradipto@ymail.com.
thanks.
Hey guys,
I fixed the issue with my network connection on the raspberry pi. My issue was that I could ssh into the pi but when I pinged google, the dns would resolve (I could see the ip address of the destination) but all packets would be lost. I couldn’t even connect to 8.8.8.8
I used STRINER’s method to access my pi, but, it wasn’t working, I then turned off my antivirus and windows firewall and it started working. I realized that most antivirus firewalls do not allow port scans and Internet Connection Sharing (ICS).
So make sure that your PC’s antivirus is turned off when using raspberry pi.
I hope this helps someone.
Tested on windows 8.1, raspberry pi 2 model b, raspbian jessie.
Striner’s method:
“hi,
after fiddling around and watching LOTS of other webpages, I have found a infinitely easier way to get internet working through headless mode (even without editing cmdline.txt)!
Indeed, go to your wifi settings, check ‘share connection’. Connect RPi through ethernet, and when you check those ipv4 properties, you will see Windows has probably given it some address like 192.168.137.1. Do not change this, as it will disable the DHCP settings for this connection!
Now, if you open a terminal and type ‘ping raspberrypi.mshome.net’ you will see it automatically resolves to an IP address.
You can also use this in Putty to connect! Just type raspberrypi.mshome.net into the test field and voila! It worked on first try and I could even immediately ping http://www.google.com from the pi! “
Assalamualaikum, Mr. Anwar.
I tried every step of the procedure. Alhamdulillah, i got it earlier. Once I upgraded the Raspbian Wheezy to Jessie, everything gone head-wire. I reformat back the SD to Wheezy, and subsequently, the internet connectivity unable to achieve. Same as other, I’m using Window 7 HP and be advised, my rpi able to Putty and Xming earlier. Very dire of your assistance thus I’m using rpi 2 for my final year project. And now, the project’s progress from 40% achievement down to 0%. Cant figure out which step I missed. Duly waiting for your assistance.
Wa Alaikum As Salaam, are you still facing the same issue?
Assalamou Alaykom Mr. Anwar,
First, I would like to thank you for this tutorial. It is great.
I am running Windows 10 on my PC and Debian Jessie on my Raspberry Pi. I followed all the steps but I wasn’t able to ping outside from my LAN. In fact, when I ping the RPi from the PC it goes well but the other way does not pass. I unchecked the Ethernet connexion from the “Protected network connexions” window and I was able to ping the PC from the RPi but not the Internet. So I probably think that the problem is coming from the Windows 10 Firewall.
I would be grateful if you can help me fixing this issue. Thank you.
Sincerely,
Nizar
Wa Alaikum As Salaam Akhi,
I’m Sorry, I don’t have access to a Win 10 machine and hence I can’t debug it 😦
your first method works great on windows 10 with raspberry pi 3 b running raspbian strech i was looking for an easy tutorial and first one that worked was this one thanks alot
Thank you for trying this on recently released Raspbian Stretch and letting us know it works on it.
Having the same issue, any idea on how to solve this?
i use raspberry pi 2 B+,i connect putty and work well,but after use wifi share option,i connect putty but it will appear connection time out..please help me get out of this.
Is the “Obtain IP Automatically” radio button still selected in the IPV4 settings?
now i fix that problem,but when i use wifi share,and it connect to pi but i cant access to internet stil
First of all, thank you! After attempting to use multiple guides your’s got things working for me. All the others failed to note you must include the static IP AND the Default gateway for the LAN cable in the cmdline.txt.
Thank you so much for this detailed guide!
You’re welcome 👍
Thank you so much Mr. Anwar for this tutorial….I have been trying to connect my rasp-pi to internet for 10-15 days using different guides and forums but it didn’t work out….your easy to follow tutorial made that happen….Thank you once again:)
Glad it helped 🙂
Hey Anwaar,
I could replicate almost everything, except that if I share my WiFi internet connection, I couldn’t event connect to Pi via putty.
I checked I have obtain IP automatically for both laptop and Pi.
Could you help me please?
Which method are you trying?
I have did as u suggested sir but internet connection is not shared..help need…. p.s very urgent review is next week
What part is not working?
Unable to access the internet.could you please help me out.everything works fine till the last step,but shows error as
ping :unknown host http://www.google.com
Which method are you trying?
Thanks for the reply.
It got fixed “sudo nano /etc/resolv.conf”
nameserver was assigned as my static given ip address so i changed to 8.8.8.8(google) It works fine now.
Thank you.
Which method were you using? I can suggest this as a solution if someone else faces similar problem. Thanks
1.sudo nano /etc/resolv.conf(It will open a editor window)
2.Changed “nameserver:*******” to “namesrver:8.8.8.8”
That’s all I did.It worked for me.
i tried method-1 & method-2. I got stuck @ last step as Manojkl. But in my case /etc/resov.conf is already having nameserver 8.8.8.8. Please help me out
Anwaarullah…Thank you for the Tutorial.Very helpful.easy to understand.
i tried all the methods(1,2,3). All steps are fine. But I m not getting internet in pi. Any suggestions? I m using Raspberry Pi 2 Model B 1GB. Please help me.
Which method is not allowing you to share Internet? Please note that all the 3 methods are different, and have to be debugged individually. If moving over from Method 1 to Method 2 (and to Method 3), please undo any changes/modifications made in the previous method.
Dear Anwaarullah, I tried all the methods (1,2,3) separately with the same initial settings. Does firewall can block internet on Raspberry? Because I could ping Raspberry as well as Internet from my computer. I could ping my computer from Raspberry-pi.But Internet is not passed to Raspberry-pi. Please help me out.
Can your retry by disabling the firewall on Windows? Some users mentioned that disabling firewall worked for them
Method 1 just worked for me on a Pi zero running windows 7. 🙂
Thanks for trying and confirming this on a Pi Zero 🙂
I am getting the error: “ping:unknown host” plz help me out 😦
Happens. Which method are you trying?
Hello, I have a question. I’m trying to connect to internet using METHOD 1.
Everything works great till step 1.8, but still I’m unable to ping any website(not able to connect to internet).
I’ve double checked sharing settings for my WIFI, seems good.
How do I troubleshoot it? Please help !!
Configuration:
1. RPi 2 Model B running Debian
2. Dell Inspiron running Windows 10
Can you please try Method 2?
Method 1: Striner’s Method works on Windows 10. I set it up using wifi through a Microsoft Surface 4 with a Simplecom USB 3.0 to RJ45 Gigabit Ethernet Network Adapter connecting to my Raspberry Pi 3.
Thanks for the help. Very quick set up.
On a side note. The Method 2: Using Network Bridging didn’t work on my Surface 4. I’ve used this method through my PC and found it to be the quickest, easiest set up, but the Surface and Ethernet adaptor didn’t seem to like it so I tried Method 1 and that worked.
Thank you for confirming what worked (and what didn’t).
method one works flawlessly jazaaka allah khayr
Wa Iyyakum. Thanks.
Hello. I am trying out the first method. However when I try the command ping raspberrypi.mshome.net I get 4 times of “Request timed out”. How do I solve this? Please help…
Any luck yet?
Same is happening with me.How do I solve this?
IS it possible to share WAN between mac and raspberry
Does one of the above methods work with the osmc os on a raspberry pi 1?
I haven’t tried it with OSMC. If you have an OSMC running, can you please test it and let us know if it works?
When i connect my raspberry pi3 with raspbian jessie with pixel installed on my sd card to the laptop via ethernet, there is no detection of network. However, if i edit the cmd.txt file and add an ip address like 192.168.137.10::192.168.137.1, only then i can see unidentified network on my laptop. However whenever i try to use it to access putty.I’m unable to do so..Could you please help me in this?
Whenever i install the raspbian jessie with pixel or raspbian jessie 2016/5/27 on my sd card, put it in the raspberry pi 3 and connect ethernet from my laptop to rpi3, do sharing from wireless to local area connection, the laptop does not even locate that there is a local area connection. If i modify the cmd.txt file from the sd card by adding for example 192.168.137.10:192.168.137.1, then after rebooting there is unidentified network which i can see from my connections. However even after i go to local area connection and go to ipv4 and set it to 192.168.137.1 and subnet mask is automatic as 255.255.255.0, whenever i want to connect to rpi via putty, it is not working. Also i noticed that the subnet mask for wireless and local area network is not same. However whenever i run my previous microsd card having raspbian jessie 2016/5/27 which i did before, it has no problem to login via putty. So i presume that the error here is not linked to the subnet mask.Could anyone please help me out with setting this up?
It works for me with the method 1.
Thank you so much!
Cool (y)
Hi thank you for sharing Method 2, I can use internet now some of the time on the Raspberry Pi 2B, and Method 2 is working ok on Windows 10 !
My only problem now I think is :
I was changing the network settings (i.e. changing /etc/network/interfaces) a lot before in Raspberry Pi trying to get it to work, and now internet is not reliable – it’s on for 5 minutes , then randomly off until I reset.. – so i’m going to install Raspbian again fresh on the SD card.. then use the Method 2 after (thanks again for this guide )
Sure. Let us know how that goes.
Lovely post and it actually made my day..
I have been able to connect the Pi2 on windows 7 and also see the gui using xming and putty.
However, are there any posts of yours for windows 10. It would be a real big help.. end up carrying two laptops everywhere until then.. LOL
Thanks again for the lovely post !! 🙂
Assalamualaikum Anwar, i’m trying to follow the 3rd method, but fail at the 12th step.
When i try to ping http://www.google.com, it shows “ping: unknown host http://www.google.com” as the result.
It can ping itself (ping 169.254.161.46), but can not ping the ethernet interface (ping 169.254.161.44).
Can you give me some suggestions?
Please help.
Thank you very much.
I try to ping raspberrypi.mshome.net but it say unreachable. How do i do?
C:\>ping raspberrypi.mshome.net
Pinging raspberrypi.mshome.net [192.168.137.206] with 32 bytes of data:
Reply from 192.168.137.1: Destination host unreachable.
Request timed out.
Request timed out.
Request timed out.
Ping statistics for 192.168.137.206:
Packets: Sent = 4, Received = 1, Lost = 3 (75% loss),
Using a latest Raspbian Image? SSH on Pi enabled? Latest image has the SSH turned OFF by default. Please have it enabled first by placing a dummy file in the SD Card (details found in first section of this post).
I know it must be irrelevant at this point but i was having the same issue and it was caused by some Windows 10 problem with ICS. To get it to work just (assuming you have enabled internet sharing, the RPi is on and connected via Ethernet, and the wole thing its not working) -> disable sharing internet -> click OK -> enable again -> click OK -> disconnect the ethernet cable -> reconnect it -> wait and maybe it will work (just like it finally worked for me)
I tried others methods like appending ip=19….. at the end of cmdline.txt in the SD but nothing else worked thanks to the faulty ics on Win 10.
I hope this helps somebody
Info:
Raspbian Stretch with desktop
Version: November 2017
Release date: 2017-11-29
Kernel version: 4.9
Windows 10
build 1709
Laptop HP without BIOS LAN/WLAN switching option (sometimes the problem is caused when you have this setting and its enabled in the BIOS)
OK I have no idea why this works but it just does. I have been struggling with Windows Networking in general but this just happens to puzzle me the most. It seems reconnecting the cable may help the ICS rediscover the device, and assigning it a new local address that works.
Kudos to you, it is never irrelevant to point out this kind of strange issue. Helped a lot.
My devices:
Raspberry Pi 2 B+ Model, running Raspbian Jessie
Windows 10 Home
Thanks for sharing (y)
Hey there,
first of all, thanks for sharing!
I was trying to bridge the connection and also sharing wifi to eth0 but non of them worked for me. When sharing my macs wifi to the pi it works flawless…not sure why though. Can you please provide your /etc/network/interfaces? Might help me 🙂
Method 1 did not work for me, dont know why.
But method 2 worked without problems.
I have a raspi B+ with jessie noobs installed and a ethernet cable to windows 10.
.. and I had a my pi named blackberry so I could do putty SSH to blackberry.local without scanning for the IP address.
(y)
hello sir!
i am using Method 1 , everything works fine but when i use ping http://www.google.com , it shows- destination host unknown,packets are being transmitted but not recieving, please help me its urgent,i cant try other method right now+ i have turned my firewall off…..
hi i’m using raspberry pi 3b with win 10. i tried all the methods. Connecting to SSH is fine but i couldn’t connect the pi online. when i ping 8.8.8.8 the error showed “connect: Network unreachable” Help me pls!!
Any firewalls on the PC blocking network sharing?
Hello, I have a problem with my Raspberry Pi. My OS is windows 10. I used the raspberry pi at the first time and it worked well using ethernet cable until i followed some instruction about Alexa and i terminated the process. After that, when i used google chrome, it stopped. Then my laptop asked to update somehow. After i updated, i cannot ping raspberrypi.mshome.net, it said request timed out, so i of course i cannot use putty anymore. But when i connect pi to my friend’s laptop using the same ethernet cable, it worked well. Do you know what is the problem and how to solve it? thanks
oh ya, i have also tried to turn off firewall, but it still didn’t work
Thanks, this was very helpful!
Assalamu’alaikum Sir, I have a problem about the step no 1 and 2. I haven’t got the reply after “ping” on cmd. So, I can’t continous the process. What could I do, Sir?
Wa Alaikum As Salaam. Maybe try method?