

Update 25th August, 2017: I haven’t tried this method yet on the recently released Raspbian Stretch version. However, one user has confirmed that the first method works on it. If it works for you, please let us know through the comments. Thanks.
Update 29th Dec, 2016: If you’re using the latest PIXEL Image, please make sure you enable the SSH Server by placing a a file named as ssh in the boot directory before trying any of the following methods. The SSH Server on boot has been disabled in the latest Raspbian image as a security measure. Read more about it here: https://www.raspberrypi.org/blog/a-security-update-for-raspbian-pixel/
Update 9th July, 2016: I’m inspired by this method https://www.raspberrypi.org/blog/programming-pi-zero-usb of SSHing into a Pi through the USB only and gonna tinker and see if we can get to also share Internet over to the Pi using only the USB. (No more messy LAN Cable 🙂 ). If you get it working, please share.
Update 10th July, 2016: I’m afraid, I won’t be able to get the above method running on a Pi 2/3 as it’s only supposed to work on a Pi Zero. If you have a Pi Zero and are interested in Sharing WiFi over USB, please check out http://blog.gbaman.info/?p=791#comment-136336
Updated 5th April, 2016 with Striner’s method
.
If this Tutorial helps you, please consider PayPaling me any positive integer at http://paypal.me/anwaarullah
This post will allow you to share WiFi Internet connection of the PC/Laptop with the Raspberry Pi which are connected to each other through a simple LAN/Ethernet cable connection at each end.
What you want to do:
- Share PC/Laptop’s WiFi Internet connection with Raspberry Pi through LAN/Ethernet connected to Raspberry Pi
What you have:
- Raspberry Pi B/B+/Pi 2/Pi 3 (If you’ve a Pi Zero, please try and let us know if this works on a Zero. I haven’t got a Pi Zero yet) running the latest Raspbian Wheezy. (I’ve not yet tried it with recently released Raspbian Jessie based off Debian 8. If you’ve been successful with this latest release, please post in the comment and I’ll update it here. Thanks.)
- PC/Laptop with WiFi Internet connection and a Ethernet Jack (LAN Connector / RJ45)
A working SSH connection with Raspberry Pi (direct access, explained here)Not required if using Striner’s or Bridge.
What you don’t have:
- Display Device for the Raspberry Pi (HDMI enabled display unit / Old TV)
- Direct Internet connection for the Raspberry Pi (LAN or WiFi)
Extra Stuff you need:
- Standard Network Cable (Cat 5, Standard or Crossover)
- PutTTY Software (will be used to SSH into the Pi)
- SD Card Writer
The easiest way to go around Sharing WiFi with Raspberry Pi is to follow Striner’s method of Sharing WiFi with the Raspberry Pi.
I’ve tested it with Raspberry Pi 3 and Windows 10 and he’s tested it on Win 8.1 and an earlier Pi and should work will Raspberry Pi B/B+/Pi 2/Pi 3. This hasn’t been tested with Win 7, though it mostly should work. Please give a shoutout and let us know if you’ve tried on Win 7 and it works.
Method 1: Striner’s Method
Tested On: Windows 10 & Raspberry Pi 3 & Pi B (the Yellowish RCA model 😉 )
Known to work on: Windows 8/8.1 & Raspberry Pi B/B+/Pi 2
Not tested (yet) on: Windows 7 & Raspberry Pi B/B+/Pi 2/Pi 3
1.1 Open up the Network and Sharing Center settings and navigate to Change Adapter Setting
 1.2 Right click on the Wireless Adapter and hit Properties
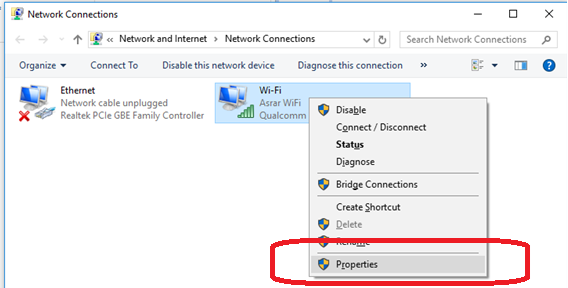 1.3 Navigate to the Sharing Tab and select the Allow other network users to connect through this computer’s Internet connection checkbox
 1.4 Now right click the Lan Adapter and hit Properties. Double click the IPV4 option and verify that some dynamic IP is populated (192.168.137.1 in my example)


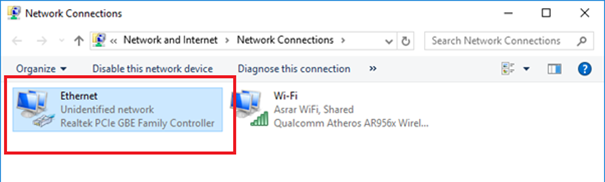
1.5 Now Power ON the Raspberry Pi (ignore if already powered ON :P) and connect one end of the LAN Cable to the Raspberry Pi and the other end to the PC. You should be able to see status messages Identifying… and eventually Unidentified network

1.6 Open up cmd prompt and type in:
ping raspberrypi.mshome.net
You should be able to ping the Raspberry Pi:

1.7 Open up Putty and set the Host Name as: raspberrypi.mshome.net and hit connect. (You can also use the IP address of the Pi revealed in the above ping prompt: 192.168.137.149)

1.8 You should be able to see the login prompt. Hit pi and raspberry and Enter

1.9 You can now
ping www.google.com
(or any other website) from within the Shell and you’ll have response messages. Congratulations! Your Pi now is connected to the World Wiiiiiiide Web 😉

Testing apt-get

Big Thanks to Danny Striner, who shared this method in a comment and tested it out. Full credit goes out to Striner. I’ve named this method as the “Striner’s Method” to honor him 🙂
P.S: If you run into issues trying out this method, please disable windows firewall and try again (as pointed out by some users in the comments).
Method 2: Using Network Bridging
Edit: [12:58AM IST, 1 Feb, 2016]: I just stumbled upon a super simple process of Bridging the connections and directly ping and access Internet on the Raspberry Pi without having to edit anything on the SD Card’s cmdline.txt file.
Tested On: Windows 7 & Raspberry Pi 2
Known to work on: Windows 7/8/8.1 & Raspberry Pi B/B+/Pi 2/Pi 3
Not tested (yet) on: Windows 10 & Raspberry Pi B/B+/Pi 2/Pi 3
This process worked flawlessly for me and I’ve wrote a detailed tutorial here: https://www.hackster.io/Anwaarullah/sharing-wifi-with-raspberry-pi-using-a-lan-cable-ae1f44
If this doesn’t work, please follow Method 3 below.
Method 3: Editing cmdline.txt file of Raspberry Pi SD Card
Tested On: Windows 7 & Raspberry Pi B/B+/Pi 2/Pi 3
Known to work on: Windows 8/8.1 & Raspberry Pi B/B+/Pi 2/Pi 3
Not tested (yet) on: Windows 10 & Raspberry Pi B/B+/Pi 2/Pi 3
Edit: 2nd Jan, 2015. Added Video Tutorial:
A large part of this post assumes you’ve read the earlier post on directly accessing the shell on Raspberry Pi through a Ethernet/LAN connection. In this post, we’ll go about setting up the Raspberry Pi to access internet through the RasPi’s Ethernet/LAN port from a Laptop/PC’s shared WiFi connection.
Method 3 Steps:
- Firstly, enable the WiFi adapter of the PC/Laptop and make sure it’s connected to a WiFi hotpspot. Open any Internet Browser and confirm internet access by opening any website.

Note: I’m using my Android device (Nexus One) configured as a WiFi hotspot J
- Now, go to Network and Sharing Center (Network Settings in Win XP) and then head to the Change Adapter Settings page. As shown below, we’re connected to ‘Wireless Network Connection’ on ‘Android 4’. Do remember the ‘Local Area Connection’ to which we’ll eventually share this connection

- Now, right click the above Network → Properties and then select the Sharing tab
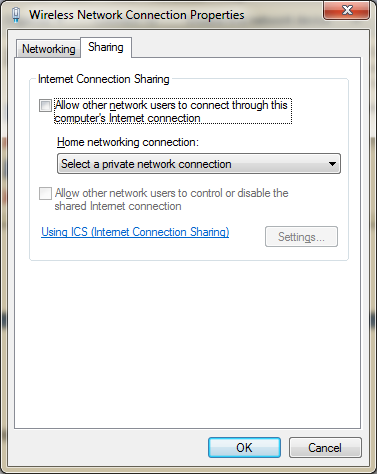
- From the drop down list, choose ‘Local Area Connection’ and enable both the checkboxes and hit OK. Once done, head back to the Adapter Settings page and you should now see the Shared info message on the Wireless Network Connection


- Now, right click ‘Local Area Connection’ → Properties and then select Internet Protocol Version 4 and then click the Properties Button

Once the properties tab pops up, make sure that the ‘Obtain IP address automatically’ checkbox is selected. If not, check it and hit OK

- Now, power up the Raspberry Pi (making sure that the Ras-Pi and the Laptop/PC are connected to each other through the LAN/Ethernet cable) and wait a minute or two while the Ras-Pi boots. Now, repeat step 5 (previous one) to make sure ‘Obtain IP Address Automatically’ is still checked.
- Open up command prompt using the hotkey Windows Key + R and then typing in cmd or simply keying in cmd in the start menu (Win 7)
- In the command prompt, key in ipconfig and scroll to the top of the info shown

Note the IPv4 address which is 169.254.39.68 in this example. Please make a note of what you see as this will be required further.
- Now, power off the Raspberry Pi and plug the Ras-Pi’s SD card into a card reader and connect it to the PC. Once the disk opens up, open the cmdline.txt file in any editor

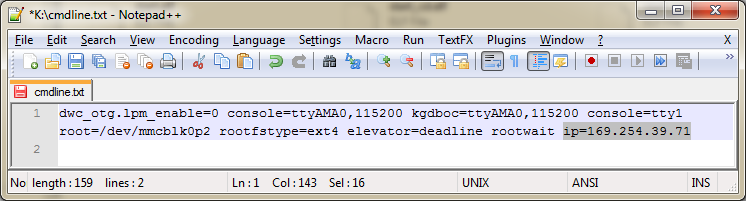
You’d probably have an entry as ip=169.254.39.71 which we set up in our previous post
- Now, to this entry, append the IPv4 which we got earlier preceded by two colons as shown below:
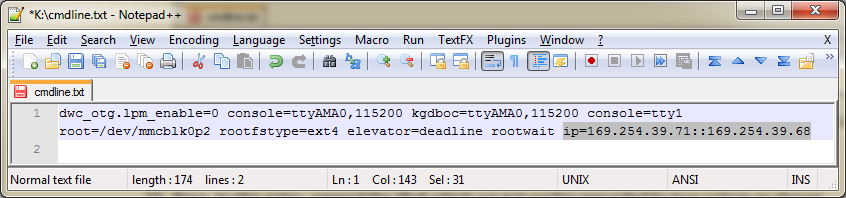
where the first half is the static IP for Raspberry Pi (169.254.39.71) and the other half is the IP of the IPV4 or Ethernet Adapter (169.254.39.68) which we obtained earlier.
- Save this file and plug the SD card back into the Raspberry Pi. Power up the Raspberry Pi and wait for a min or two. Establishg a direct SSH connection with the Raspberry Pi as explained in the previous post.
- Now, to verify if our Ras-Pi is Internet-Connected, type in this command in the Shell (PuTTY terminal connected to the Ras-Pi)
and you should see response from the servers as shown below:

Voila!!! Your Raspberry Pi is now connected to the World Wide Web 🙂
- Going one step further, lets direct access the Raspberry Pi’s desktop and open up the midori browser. Verify Internet connectivity on the Ras-Pi by opening any website.

Note (Edited: 5th Feb, 2015): Midori browser is no longer coming pre-installed with the latest Raspbian version and has been replaced with Epiphany Browser. Please use that instead to verify internet connectivity.
Method 4:
Check out the comments. Many users have shared their own techniques which work on Win 8/10 flawlessly.
Please let me know your feedback or questions through comments.
Thanks 🙂
References:
- http://pihw.wordpress.com/guides/direct-network-connection/super-easy-direct-network-connection/
- https://anwaarullah.wordpress.com/2013/07/16/direct-access-raspberry-pi-shell-and-desktop/
P.S: Did this post help you? Please leave your feedback. If you’ve tried some additional steps that helped you in getting this working, please share so we all can benefit from.
If you’ve benefited from this post, please consider donating and help me buy new development stuff and create new tutorials/resources. Thanks!


Reblogged this on anthonyvenable110.
am stuck here now…doesnt seem to connect. Please help me out ..followed all the steps.. any suggestions? thank you
Sorry, I was in office so didn’t get time to reply. Have you had any success with it? This is a little tricky and requires lot of trial and error. If you’re still facing issues, lemme know and I’ll call or email you.
I enjoy what you guys tend to be up too. Such clever work and reporting! Keep up the fantastic works guys I’ve included you guys to our blogroll.
Hey there,
I’m having trouble with the wireless as well. My laptop is connected to my wireless router and when I go into wireless network connection properties -> sharing tab, there is no drop down.
I’m using window 7.
Hope I’ve given enough details… just message back if you need more info 🙂
Thanks in advance.
Hi Stephenie,
You first need to configure your WiFi adapter to share it’s Internet. Right click the WiFi adapter and on opening the properties, you should be able to enable sharing. Once done, plug in the Raspberry Pi to the LAN jack of your PC and you’ll get this LAN as a sharing option in the dropdown.
Lemme know if that works or not.
I also have no drop down menu under my Wireless Network Connection Properties. Also, enabling sharing for my Wireless Network Connection can only be done by disabling my LAN sharing options thus causing Putty to not work.
Interesting, I don’t see the Dropdown in your image. Is that option locked down by your Admin if that’s an office workstation? Can you see that dropdown for other Networks?
I have the same problem as Stephenie and James.
Here is my options screenshot:
Thanks for the post,
Unfortunately I am still unable to access the internet. I am using Windows 8 and the only difference in direction was there was no dropdown from Step 4 but after reading elsewhere I don’t believe that is the problem. And from Step 8 “Ethernet adapter Local Area Connection” is “Ethernet adapter Ethernet” instead.
I’m connecting via SSH which I just got working by editing cmdline.txt. I appended the ip address from Step 8 to the end following directions. However, I still can’t access the internet. When I ping google.com I get “ping: unknown host google.com.” Any ideas?
Thanks in advance!
I have the same issue. I can ping each other, pc with windows 8 and pi – earlier I can’t ping from pi to pc but I disable windows built in firewall and than start working. But I still can not get access to Internet through my pc. I was googling for bot I can’t get answer.
Hi there !
I’m new to RPi, and I managed to connect my laptop to the Pi in headless mode (with direct SSH through the ethernet cable), but I couldn’t connect it to the internet, although I followed your indications. I always get the ping error “ping: unknow host name”. What can I do to fix that ?
Thanks ! 🙂
in step 5 i am not able to see the ip address..
it shows “in order to configure TCP/IP you must install and enable network adapter card”
please help me … what should i do???
anandpunchiri@gmail.com
in step 4 the drop down list is not showing…. so i cant select local area .. please help me
Internet connection didn’t work for me. When I have the network sharing enabled the Pi connection via Putty closes – am I missing something?
Are you able to reconnect back to the Pi using Putty? Have you given a static IP to the Pi? Can you also try hard rebooting the Pi whilst it’s connected to PC thru Ethernet?
I am having a little problem with connecting to the internet. I followed all the instructions exactly but when I try to ping a website i.e. google i get the error ping: unknown host http://www.google.com. I am using windows 8 with putty. What does this mean?
I was similar problem. I connected PI with PC (Win8) directly via Ethernet cable, and my PC was connected to router via WiFi. I could ping PC and Pi but I couldn’t connect to Internet in my Pi. I decide moved my Pi and connect it to router using ethernet cable. My PI have static IP. I spent a lot of time on it before I could understand everything. If you have posibility to connect your Pi with router, this is the best solution for me. In Windows 8 I achieved only connection between Pi and PC.
Having a router makes this setup redundant as the idea is to share Internet available on a PC through WiFi to a Pi connected to the PC through a cable/LAN.
I was thinking of giving up the idea if it is able to connect directly to the router. I wasted a couple of evenings to try sharing Internet through PC.
Windows 8 seems to be blocking traffic and has stricter firewall rules. I myself don’t have Win 8 yet, so haven’t tried this on it.
for windows 8 users after allowing other computers, u should see ipv4 properties of ethernet network and DONT check”obtain ip automatically”.. instead copy the ip(say 192.168.137.1) and edit cmdline.txt and add ip 192.188.146.205::192.188.146.2…it works.
Thanks Harsh. Hope this helps Windows 8 users.
Thanks, it works in windows 8 🙂
Glad it did 🙂
I did not understand the method Harsh mentioned to work in windows 8. Could you please explain the last line ?
FYI, I followed all the instruction you mentioned in this guide. But unfortunately it did not connect to the internet. I am using windows 8.1 While using automatically detect ip I got the address as: 169.254.117.79 then in the cmdline.txt I added ip 169.254.117.81::169.254.117.79
Can you please tell me how to resolve this by not choosing “obtain ip automatically” as Harsh told above? Thank you!
Can you try what Vojtech tried for on windows 8 and let us know if that works…
When I don’t check ‘obtain ip automatically’ I get the default-set ip address as 192.168.137.1. In the cmdline.txt file, where should I be adding 192.168.137.1 to? should it be, following your example, ip=192.188.146.205::192.188.146.2::192.168.137.1? or be ip=192.188.146.205::192.168.137.1? Thanks for helping out!
What IP is assigned to the Pi? Have you been able to directly SSH into the Pi from your Laptop/PC?
What ip do you place in putty to connect with this method
Hi, could you please elaborate a bit? I can’t seem to connect through Putty.
I left the “Obtain address automatically” unchecked, and indeed it addressed a value of 192.168.137.1 to my RPi. You said to copy that address, but where do I fill it in?
My network is on the range of 192.168.178.x, and my laptop has 192.168.178.20 (dynamic).
Now what do I fill in in cmdline.txt and what do I fill in in Putty?
I’ve tried several combinations but I get either “connection refused” or “connection timed out”.
Thanks!
Have you firstly been able to SSH into the Pi directly from your Laptop? What’s the IP being assigned to the Pi?
What ip do you place in putty to connect?
In Putty, we’d still use A.B.C.12 which is the fixed IP of Pi that we’ve assigned inside cmdline.txt
What ip do you place in putty to connect with this method
Thank you. This solved my problem too.
hi,
after fiddling around and watching LOTS of other webpages, I have found a infinitely easier way to get internet working through headless mode (even without editing cmdline.txt)!
Indeed, go to your wifi settings, check “share connection”. Connect RPi through ethernet, and when you check those ipv4 properties, you will see Windows has probably given it some address like 192.168.137.1. Do not change this, as it will disable the DHCP settings for this connection!
Now, if you open a terminal and type “ping raspberrypi.mshome.net” you will see it automatically resolves to an IP address.
You can also use this in Putty to connect! Just type raspberrypi.mshome.net into the test field and voila! It worked on first try and I could even immediately ping http://www.google.com from the pi!
Wow. That was simple. I’ll test it out today. Thanks 🙂
Sounds good! Which version of Windows you are using?
I’m using Windows 8.1, but I guess it will be the same for 8 and 7 (though I haven’t tested that).
Other forums I read said it should be possible to connect to “raspberrypi” but I could never find that address. Then when someone said it should be “raspberrypi.mshome.net” it magically worked.
I’ve been trying this in win 7.
raspberrypi.mshome.net hasn’t worked for me.
what do you mean by test field in putty? did you mean host name?
I’ve been trying this in win 8.
raspberrypi.mshome.net hasn’t worked for me.
what do you mean by test field
test field should be text field, small typo, sorry 🙂
yes, the host name field.
Did you follow the rest of the steps before trying to ping this address? (share internet connection and not editing the IP settings)
Did you empty any IP assignment on the boot file?
It won’t work else.
Thank, it really worked as a magic and indeed you don’t have to change anything in cmdline.txt.
Glad it worked 🙂
Did you get the sharing without editing anything in the cmdline.txt file?
Of course, before I declared some address for Pi, but it seems that it doesn’t matter. What I noticed is that you should do everything in correct order, I mean unplug ethernet cable, set sharing in Inthernet connection properties and than plug Pi again. If you firstly enable sharing and then unplug/restart your Pi, hostname won’t be recognized…
This method also worked for me on a Raspbery Pi Model B+, working on Windows 8.1. Thank you both Anwaarullah and Striner for your combined help on this! You are awesome!
Thanks for letting us know about it(y)
Hi,STRINER I am also using windows 8.1 and i tried your method.The address 192.168.137.1 gets assigned to ipv4 properties but when i ping raspberrypi.mshome.net it says “could not find host raspberrypi.mshome.net please check the name and try again.” Please help.
Thanks Striner, it’s worked with my Raspberry Pi on Windows 7.
(cool)
Dude, you are just awesome! This works perfectly
I am getting access denied on entering the default password ‘raspberry’
Thank You, You made my day 🙂 This is the easiest and really working solution on W10.
Hi Having same problem that seems consistent to the above posts
no drop down box/list with LAN option in wireless sharing check box
I am able to connect to putty and connect to PI and get vncserver up and running but no internet connection (have windows 7)
Any help from anyone appreciated have spent quite a bit of time tryib=ng to resolve but with no luck
Regards
Sean
This is what I did to get it to work:
http://www.instructables.com/id/How-to-Set-Up-a-Wireless-Hotspot-Windows-7/step1/Step-1-Enabling-the-Microsoft-Virtual-WiFi-Minipor/
Is there any way to use the laptop as a router or switch? I don’t want RPi to have different IP address (169…) than my home network (10.0.0.X). Is it possible?
Yes, you can use the Laptop as a Router or a Switch. I’ve myself not tried though.
I tried “bridge network” feature for WLAN and LAN. It simply worked :).
Great 🙂
If you are having trouble accessing the sharing tab options on your wireless connection try enabling the microsoft virtual wifi adapter. Look at this instructable:
http://www.instructables.com/id/How-to-Set-Up-a-Wireless-Hotspot-Windows-7/step1/Step-1-Enabling-the-Microsoft-Virtual-WiFi-Minipor/
The command I used was:
netsh wlan set hostednetwork mode=allow ssid=yourssidname
Just replace yourssidname with whatever name you want the virtual wlan to be. The name was important to me. It wouldn’t work without it.
Thanks for the tutorial!!
Thanks David for sharing that.
Hi,
Firstly, I want to thank for the post. It is useful, indeed. But I have an issue. I’ve done all the things , I can connect my Raspberry Pi through SSH, ping Google successfuly but I can not open internet sites in Midori. It is failing all the time.
What do you think causes this problem? Am I missing something? I’m using Windows 7. Can you help me? Thanks.
Can you try pinging any other site instead of Google only?
I’ve just pinged Yahoo, Nba, Facebook and Twitter successfuly.
Have you had any luck getting that running on Midori?
Once I was able to connect google.com and several other sites. That was approximately one or two weeks ago. I haven’t formatted my SD Card or changed any settings as far as I remember.
Excellent, it works like a charm Thank you!
Hello Anwar
You have written perfect tutorials for us.
I’m very thankfull for your efforts.
I have followed your tutorials on direct connected Rasp Pi to computer via ethernet cable, it all work seamlessly.
However I’d like to have Rasp Pi’s independent internet connection via wifi (connected direct to wifi router, instead connected to computer via internet connection sharing), while in the same time the rasp pi also can be accessed via ethernet cable to computer.
So, the idea is that the rasp pi has its own wifi adapter, its own power (not depends to computer usb’s) thus after the computer executes rasp pi command (example: downloading a large file), user can then shut down the computer while the rasp pi keep downloading the file because it has it own internet connection and its own power.
Can we do that? How is the internet/ ipv4 thing setup?
Thanks in advance
If you’d like to have the Pi connect to the Router, you may use a USB WiFi dongle and have it setup using wicd-curses utility on the Pi. I’ve not tried a simultaneous connection on WiFi and Direct Access Lan; However, what I’ve tried is connecting the Pi to the Router via WiFi and LAN at the same time. You can then connect your Computer to the same network and schedule large file downloads.
After hell lot of trials I am able to ping google…. VIOLA 😀
Glad it worked 🙂
Finally its working for me, Thanks !! 😀
Glad it’s working 🙂
hi i really need helping to connect my raspberry to internet conection. i use ssh for display rpi. i want sharing internet conection from the laptop to rpi with utp cable. my laptop conect to internet with wifi tethering form my handphone. internet was successfull to access lan adapter from sharing conection. but why if i want to update in my raspberry always failed. thanks for read my question. please for answered 🙂
Firstly, do you have the direct LAN access method working?
Hello ! thanks for this guide. But its not working for me. I can connect with putty without any problem but cannot share the internet. I dont know what is wrong. Can you share your /etc/network/interfaces file please ?
ping http://www.google.com
ping: unknown host http://www.google.com
And I cant also ping the IP of the IPV4 or Ethernet Adapter.
My /etc/network/interfaces file would be the default one without any changes 🙂
Getting this setup running sometimes takes a dozen tries. Were you able to first get the Direct Access as described in my previous post working?
Thanks Syed….. Great post … u saved me money and time and lot of headaches…
Glad 🙂
Can anyone please confirm if this works on Raspberry Pi B+ with the latest Debian release?
Hi,
Thanks for your article. I used to have this working perfectly. Then I set up wifi on the RPi and was connecting using that. Now I’m trying to get headless with shared internet working again…
The RPi is running Raspian
My laptop is running Windows 7 Pro 64
I’ve got the headless part working fine. I can ssh into the RPi and control it from the laptop
…but I can’t get the shared internet working
I can ping the RPi from the laptop
I can ping the laptop from the RPi, but only if I disable Windows Firewall for the public network (which is how the RPi appears). If Windows Firewall is monitoring public network I can’t ping the laptop from the RPi, even though I have enabled ICS and Port 22 in Windows Firewall.
Even with Windows Firewall disabled, the RPi doesn’t have an internet connection.
The end of cmdline.txt reads ip:169.254.226.228::169.254.226.226 I tried changing the last number of the first part to 222 and headless still works, but ICS does not.
I suspect the problem is either in Windows Firewall, or that there is something hanging around in the RPi from when I had wifi working (though I have tried to put /network/interfaces back by #commenting out the wlan lines)- do you have any ideas?
Thanks for your help
Ian
Ian, can you try what DavidD tried in here: http://anwaarullah.com/blog/sharing-wifi-internet-connection-with-raspberry-pi-through-lanethernet-headless-mode/#comment-74
Let me know if that also fails.
Hello everyone,
I’m trying to connect a R-Pi B+ to the internet through SSH on my Windows 8.1 laptop. I am able to connect it to the R-Pi (I’ve used both the method described in Syed’s earlier tutorial as well DHCP enabled with MRemote-NG). In both cases, I’m able to connect my laptop to the R-Pi. However I cannot connect the R-Pi to the internet using the method listed here as well as the one suggested by STRINER. Any ideas?
I believe Win 8.1 has some firewall blocking rules that’s preventing the sharing from happening. I’m not sure, but I remember I read someone’s comment mentioning this about Win 8.1.
I am running on Windows 8.1 and I failed to set up my Raspberry Pi with this tutorial.
BUT I have SUCCEEDED with this other tutorial: http://pihw.wordpress.com/guides/direct-network-connection/super-easy-direct-network-connection/
I encourage everyone to have a look at it, because now it’s WORKING!!!!
Thanks a lot Rasbee for confirming that those scripts are working as well. It’ll help others here attempting to do that.
Can anyone please confirm if the scripts are working on Win 7 as well?
Allah razı olsun kardeşim (Allah bless you bro) 🙂
Jazakallahu Khair 🙂
I love you guy!!
Hey anwarullah i am able to access putty if I edit the cmdline.txt by adding ip=A.B.C.12::A.B.C.9.
I place the ip A.B.C.12 in SSH and i am able to login, but unable to ping http://www.google.com. I am using windows 8. Please help
Windows 8 is a pain sometimes 🙂 I’ve myself never tested it on Win 8. Have you enabled Network Sharing on your WiFi adapter inside the network settings? Have you done that while the LAN to Pi was connected?
Hello,
It worked! Thank you very much!
I have an extra idea:
Access the raspberry pi via ssh on the localhost via the laptop.
The ip address of my raspberry pi works on my laptop to communicate via ssh, but if i type that ip address on putty on another pc on my home network it won’t work.
Can this done via another ip address or is this not possible?
Sorry for my bad English.
bmou1999
Glad it worked. Yes, it can be done via another IP address as long as all of them are connected to the same network.
Hello,
My raspberry pi has now a IP address with something like 10.0.42 . For ssh to my laptop with shared connection running lubuntu has a IP address something like 192.168 As I want to access it on another computer on my network.
How can I change the IP address of the raspberry pi on my laptop?
Thanks for your reply
Bmou1999
Hello,
I followed all your steps and was able to connect to internet three months ago.
But now I could not.Dont know why!
I could ping my laptop with pi using ssh and the other way also.I am using my android phone as wifi hotspot.I could connect to internet in my laptop using that.But not from pi. 😦
Could You Please help me as soon as possible.I need to install softwares.Please help me.
Make sure the IPV4 properties of the LAN Adapter are set as “Obtain IP Automatically”. Usually, these change and hence the fixed IP doesn’t work. Let me know if that helps/not. Thanks.
i have a problem in step 8. when i give ipconfig in the command prompt, the next statement i get is that it is not a recognized command. what should i do for this?
thanx in advance.
Try this steps:
Open command prompt and then:
1. cd C:\Windows\System32 (and hit Enter)
2. ipconfig.exe (and Hit Enter)
Hope that works
success thank you very much 🙂
Glad it helped 🙂
thank you a lot ! really needed this to work
Did it work?
Thanks Anwar! Ive been trying this for week and just connected my Pi to the internet.
Congrats!!! 🙂 Enjoy
Sir I tried to access cmdline.txt using hdmi capture device but I am not able to overwrite it.?what would be the problem
You can try log in with root and save it then
Bmou1999
Sir how to login with root.Sir please help because i m very new to raspberry pi.
If you already have logged into shell as a Pi user, you may simply precede your commands with sudo to have super user root privs. Since I understand that you’re trying to edit the cmdline.txt file, you may use this command:
you can do as ANWAARULLAH suggests or login as sudo:
Username:sudo – password: root
Or you can cheat and simply type in
sudo su
=)
sir when i am writing leafpad in the putty terminal the leafpad opens but when i pinged google.com
it is showing as unknown host
Hi,
thanks for this tutorial. It’s really synoptic. But I have the same problem as mentioned at the beginning and I think, that nobody solved it yet. There is no drop down in sharing and although I followed all of these steps, I’m not able to ping any website. (I have win7).
Thanks in advance.
Do you at least get a text field for entering the network name that’s to be shared?
Yes. And I eventually succeeded and because of that joy a forgot to reply, sorry. This page https://pihw.wordpress.com/guides/direct-network-connection/super-easy-direct-network-connection/ and yours page was very helpful, so thanks.
🙂 Glad it worked
thanks. very useful
Thanks 🙂
Thanks for the explanation. Much better than to install additional software on the
Windows Laptop.
A note: Windows has changed the Ethernetadapter to static after sharing the Internetconnection of the WLAN.
So I had to change the cmdline.txt and take the new address.
Yep, Windows sometimes assigns a static IP after WLAN interconnection. Instead of again changing the cmdline.txt file, you can plan at simply changing the adapter settings back to Obtain IP Automatically.
Hi,
I hv succesfully obtained the ip address, however i didnt get response when i ping the google, I also noticed that when I go into wireless network connection properties -> sharing tab, there is no drop down. I’m using window 7 n raspberry pi b+. Do you know what is my prob, thank in advance !
After you obtained the IP address, did you go back in the Network settings and made sure Obtain IP Automatically button is selected?
I have done everything up to step 9.My Raspi’s SD card has completely different files in it. Mine has the folders ‘os’ and ‘defaults’, and the files ‘bootcode.bin’, ‘BUILD-DATA’, ‘INSTRUCTIONS-README’, ‘recovery.cmdline’, ‘recovery.elf’, ‘recovery'(Disk Image), ‘recovery.rfs’, ‘RECOVERY-FILES-DO-NOT-EDIT’ and ‘riscos-boot.bin’. Here’s a pic: http://imgur.com/2Y3xFCZ Email: zaccybot@gmail.com
Yes, you have those files because you are using NOOBS image file. This method doesn’t work with NOOBS image. I’m sorry for not having mentioned that in the article. You may need to reflash the SD Card with the Raspbian only image. Thanks.
Oh ok, thanks for the quick reply. Great tut by the way
Hay,,
I followed all your steps, I can access my rpi via putty. but I can’t get the shared internet working! Why?
My rpi have ip static
Have you made sure that that Obtain IP Automatically settings are still enabled after turning on the Internet sharing settings? What Windows version are you on?
How do you open command line text file. For some reason when I insert the sd card to my laptop, it prompts me to format the sd card to use therefore am not able to edit the command line text file. Could you please suggest an alternative to this please?
Do you have access to a Linux machine? Or a Linux live CD? You could use use that to edit the file since windows now shows your SD card as corrupt and asks you to format it. Can you otherwise try reflashing the OS onto the SD card and then editing the cmdline.txt file?
Thanks
seriously friends, if you don’t configure this thing than please look at it one more time, because this guy is awesome. what he says is how its done. i did it as per he says, thanks sayd.
Thanks Devang 🙂 Those are some nice words!
i got a little problem here
my local area connection cable is said to unplugged even if i have connected it
when i connect my rpi it connects to Ethernet
Can you please try with a different LAN Cable? Do you see those LAN lights on the Pi Blinking?
helped a lot 🙂
Thanks.
Thank you. Glad it helped 🙂
Able to ping 8.8.8.8 but not http://www.google.com
I just started working with raspberry pi. I followed the entire above step. At the end I am able to ping 8.8.8.8 IP which means I got internet access to my raspberry module. But not able to ping DNS – http://google.com, getting error “unknown host”. And also not able to perform and updates, getting error “Failed to fetch __”
I am not getting whether I got internet access to raspberry board or not. And if yes, then why not able to access DNS and updates.
I searched I lot this problem. But not getting any proper answer. Please somebody help.
Did you modify the hosts file?
Facing the same problem as Harish Singh..I have modified the host files..please help
I’d not recommend modifying the host files.
Hi..
I am using windows 8.1 and I try all method, but still not get success for get internet connection in my rasbperry pi..
I also used method mention by STRINER, and other members but can’t get internet access in pi..
help me for get internet access in pi with help of wifi in windows 8.1..
I also try bridge connection, it not working..
Any update on it working?
This is mostly a trial and error method ai you’ve to try it for a while before it works (esp on Win 8).