After having received the Dev Kit from LeapMotion team a while back, we enjoyed playing with the many demos, examples and libraries posted by fellow Leap Developers. Many asked for linking with H/W including Android, Raspberry Pi and Arduino. A few mustered the courage to get Hardware rolling using the Leap. Some examples included the control of a Labyrinth maze using the Leap (http://www.youtube.com/watch?v=eHpD3Wuj2Co).
In another recent development, Xavier (http://xseignard.github.io/2013/06/25/interfacing-leap-motion-with-arduino-thanks-to-nodejs/) successfully Interfaced the Leap and Arduino using the Node.js library. This was pretty cool, except for the fact that the Arduino had to be connected to the USB of the PC from where it was receiving data using the Firmata protocol. A rather unfortunate(or fortunate) thing is that I burned up 2 of my USB ports leaving only one port working on my Laptop to which I had a choice of connecting either the Leap or the Arduino. So, in essence, we couldn’t try the above demo.
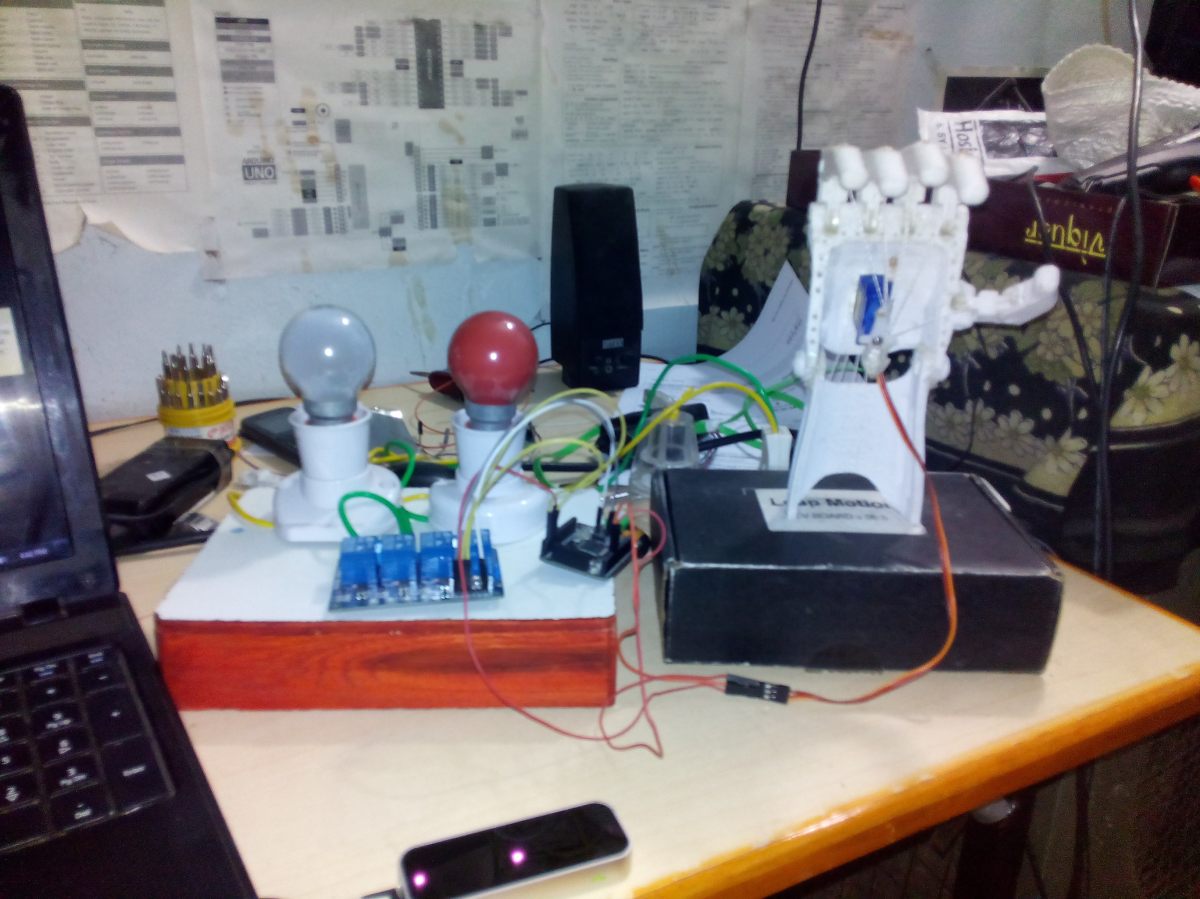
That set me thinking wouldn’t it be a lot cooler if we could use our Laptops’s inbuilt Bluetooth module to send Leap data wirelessly to a ‘Bluetooth enabled Arduino’ and have some fun? That idea, coupled with some intense coding, a boring Saturday, some electric shocks resulted in this:
For those already familiar with Java, Eclipse, LeapMotion, Bluetooth RXTX using Java, here’s the Source code with the references:
package com.leaparduino.hello;

/******************************************************************************\
* Copyright (C) 2012-2013 Leap Motion, Inc. All rights reserved. *
* Leap Motion proprietary and confidential. Not for distribution. *
* Use subject to the terms of the Leap Motion SDK Agreement available at *
* https://developer.leapmotion.com/sdk_agreement, or another agreement *
* between Leap Motion and you, your company or other organization. *
\******************************************************************************/

import gnu.io.CommPort;
import gnu.io.CommPortIdentifier;
import gnu.io.SerialPort;

import java.io.IOException;
import java.io.OutputStream;

import com.leapmotion.leap.Controller;
import com.leapmotion.leap.Frame;
import com.leapmotion.leap.Listener;
//import java.lang.Math;
class SampleListenerMain extends Listener {

public void onInit(Controller controller) {
System.out.println("Initialized");
}

public void onConnect(Controller controller) {
System.out.println("Connected");
}

public void onDisconnect(Controller controller) {
System.out.println("Disconnected");
}

public void onExit(Controller controller) {
System.out.println("Exited");
}
public void onFrame(Controller controller) {
Frame frame = controller.frame();
System.out.println(frame.fingers().count());
LeapIntoArduino.writeToArduino(frame.fingers().count());
try {
Thread.sleep(500);
} catch (InterruptedException e) {
// TODO Auto-generated catch block
e.printStackTrace();
}
}
}

class LeapIntoArduino {
static OutputStream out = null;

public static void main(String[] args) {
//Connect to Arduino BT
try
{
(new LeapIntoArduino()).connect("COM12");
}
catch ( Exception e )
{
e.printStackTrace();
System.exit(0);
}

// Create a sample listener and controller
SampleListenerMain listener = new SampleListenerMain();
Controller controller = new Controller();

// Have the sample listener receive events from the controller
controller.addListener(listener);
// Keep this process running until Enter is pressed
System.out.println("Press Enter to quit...");
try {
System.in.read();
} catch (IOException e) {
e.printStackTrace();
}

// Remove the sample listener when done
controller.removeListener(listener);
}

void connect ( String portName ) throws Exception {

CommPortIdentifier portIdentifier = CommPortIdentifier.getPortIdentifier(portName);
if ( portIdentifier.isCurrentlyOwned() )
{
System.out.println("Error: Port is currently in use");
}
else
{
CommPort commPort = portIdentifier.open(this.getClass().getName(),2000);

if ( commPort instanceof SerialPort )
{
SerialPort serialPort = (SerialPort) commPort;
serialPort.setSerialPortParams(9600,SerialPort.DATABITS_8,SerialPort.STOPBITS_1,SerialPort.PARITY_NONE);
out = serialPort.getOutputStream();
}
else
{
System.out.println("Error: Only serial ports are handled by this example.");
}
}
}

public static void writeToArduino(int noOfFingers)
{
String tmpStr = Integer.toString(noOfFingers);;
byte bytes[] = tmpStr.getBytes();
try {
out.write(bytes);
} catch (IOException e) { }
}
}