

Update 15th Sept, 2017: The easiest way to get this running on a Raspberry Pi Zero W is outlined here: https://learn.adafruit.com/raspberry-pi-zero-creation?view=all where you’d only need an available WiFi connection. If you don’t have a WiFi connection, use your dumbPhone and setup a WiFi Hotspot. This is much easier than using a USB-Ethernet Adapter and then following the following methods.
Update 29th Dec, 2016: If you’re using the latest PIXEL Image, please make sure you enable the SSH Server by placing a a file named as ssh in the boot directory before trying any of the following methods. The SSH Server on boot has been disabled in the latest Raspbian image as a security measure. Read more about it here: https://www.raspberrypi.org/blog/a-security-update-for-raspbian-pixel/
Before you go neck-deep into this post, please check if this post is applicable for you:
What you want to do:
- Access Raspberry Pi’s desktop on Laptop/PC screen
What you have:
- Raspberry Pi A+/B/B+/Pi 2 (If you’ve a Pi Zero, please try and let us know if this works on a Zero. Not tested with a Pi 3 either) running the latest Raspbian Wheezy (I’ve not yet tried it with recently released Raspbian Jessie based off Debian 8. If you’ve been successful with this latest release, please post in the comment and I’ll update it here. Thanks.)
- Laptop (Windows 7 or XP with Internet connection, required to download one setup file)
- A working SSH connection with Raspberry Pi (direct access, explained below)
What you don’t have (and not required):
- Display Device for the Raspberry Pi (HDMI enabled display unit / Old TV)
- Internet connection for the Raspberry Pi (LAN or WiFi)
Extra Stuff you need:
- Standard Network Cable (Cat 5, Standard or Crossover)
- PutTTY Software (will be used to SSH into the Pi)
- SD Card Writer
There are hundreds of tutorials sprawling across the web that show you how to remote access your Raspberry Pi’s desktop from your laptop/PC. This will come handy if you don’t have (or don’t want) a display unit to see your Pi or want to use your Laptop/PC’s screen and keyboard/mouse itself. This mode of accessing the terminal and/or desktop of the Raspberry Pi without connecting it to any display unit (and not connecting any keyboard/mouse to the Pi) is usually termed as Headless mode.
In most of the remote desktop tutorials, you’d need to initially install TightVNC Server (software that streams the Desktop’s GUI to any VNC Client) on the Raspberry Pi and then install any VNC viewer on the Laptop/PC. Now, installing TightVNC server on the Raspberry Pi requires it to be connected to the internet. And here’s my problem: I don’t have a Router or Internet cable in my home. I essentially use a 3G dongle for all my internet needs.
We even tried installing XRDP onto Raspberry Pi (by copying the tar and running it on the Pi) but this failed as it tried downloading the missing dependencies.
We tried couple of methods to share our Laptop’s internet connection with the Raspberry Pi but they failed. Desperate still to access my Raspberry Pi’s desktop, we stumbled upon this setup which finally worked.
Before we proceed with remotely accessing the Raspberry Pi’s desktop, we first need to be able to SSH into it (access it’s shell, akin to command prompt in windows OS). The procedure for SSHing into the Raspberry Pi without the need of any Display Device for Raspberry Pi is explained below.
Direct SSH into Raspberry Pi in Headless Mode
In this tutorial, we’ll quickly setup our Raspberry Pi connected locally to our PC/Laptop using a standard Cat 5 Ethernet cable (crossover not required).
Edit: 1st Jan, 2015:
Edit: 11 September, 2015: Can someone please confirm if this works on Windows 10? Thanks.
I compiled a quick video illustrating the following steps so that you can configure it more easily.
Please follow the below steps to have a working SSH connection:
- Install and burn the latest Raspbian Wheezy OS onto the SD card for the Raspberry Pi
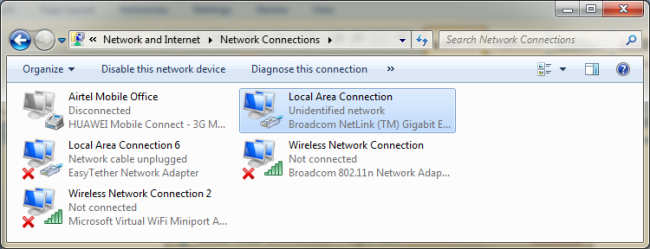
- While the Raspberry Pi is switched off, connect one side of the Ethernet cable to Raspberry Pi and other side to the RJ45 jack of the PC/Laptop
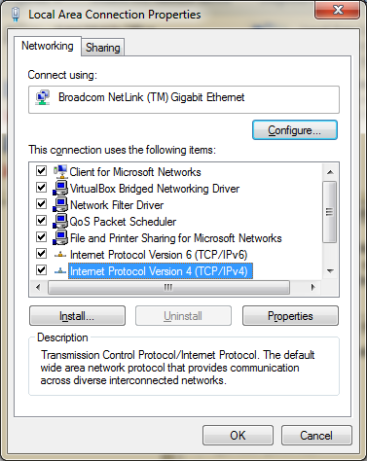
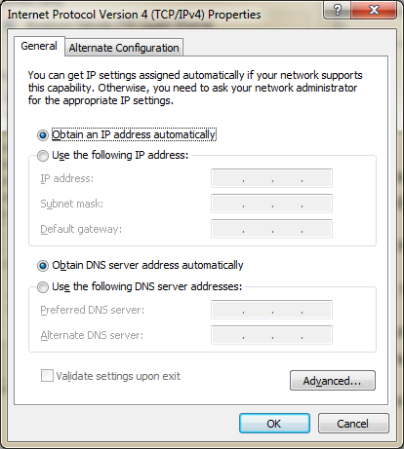
- Open LAN properties and make sure that IPV4 properties are set to Obtain IP address automatically as shown below:


- We now need to determine the IP of our PC/Laptop when it’s connected to the Raspberry Pi
- Now power on the Raspberry Pi while making sure that the network cable is connected on both ends
- Wait for a min or two. You’ll notice that the PC/Laptop will scan and then show a small warning indicating the presence of an unidentified network


- Now, open command prompt and type ipconfig. Note the IP of the Ethernet Adapter Local Area Connection as shown below:
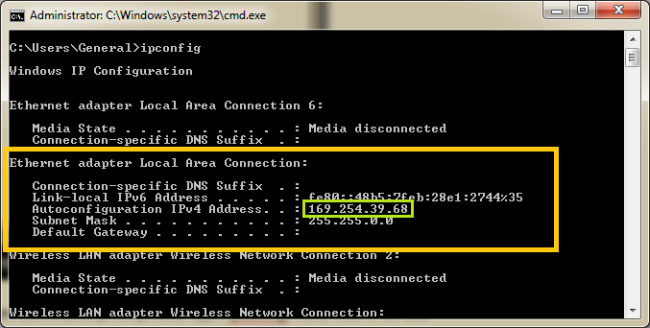

In our example, its 169.254.39.68
- Now, power off the Raspberry Pi and take out the SD Card. Plug in the SD card into a card reader and open it. You should see a couple of files
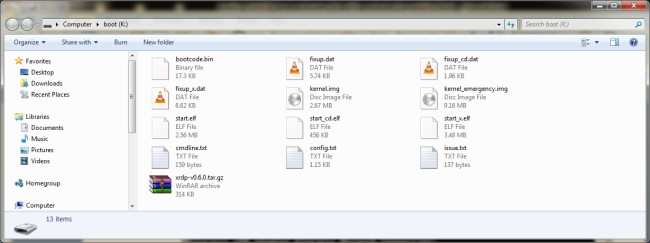

- Open the cmdline.txt file and append this to the end of it:
ip=169.254.39.71
Please change the IP accordingly and assign a unique value (while making sure you don’t go beyond the subnet mask). Preferably, change only the last parameter
For example, if your LAN’s ip is 169.254.0.1, we recommend using 169.254.0.3 as the IP for Raspberry Pi in cmdline.txt
- Save the cmdline.txt file without making any other changes
- Plug this back into the Raspberry Pi and with the Ethernet cables connected, power on the Raspberry Pi
- Wait a couple of minutes while the Raspberry Pi tries to establish a local network connection with our PC/Laptop
- Once you see the network warning message as shown above, ping the Raspberry Pi to see if it’s live on the network as follows
- Open CMD prompt
- Type ping ipaddress_of_raspberry-pi
Ex: ping 169.254.39.71
If all went good, you should see the Pi responding back to the ping requests as shown below:

- Now its time to SSH into the R Pi. Open PuTTY client and type in the IP address of the Raspberry Pi (169.254.39.71) and hit Open
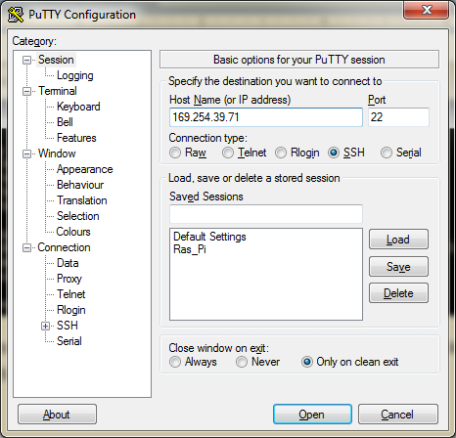

You should get a certificate trust warning message (if SSHing for the first time) which you should accept. Once done, you’ll see the login terminal:
Enter pi
The password should be raspberry
Once done, hit enter. You should now see bash prompt as shown below:
Voila, you’re now SSHed into the Ras Pi. It’s all yours now 🙂
Now, moving on to access the Raspberry Pi’s desktop, we first need to install Xming X Server for windows from this link:
http://sourceforge.net/project/downloading.php?group_id=156984&filename=Xming-6-9-0-31-setup.exe
Make sure you install the SSH components also when prompted to do so.
Once that gets successfully installed, simply click the Xming icon and make sure it’s running in the background

Now, open PuTTY terminal and first enable X11 forwarding as shown below:
Now, direct SSH into the Raspberry Pi as explained previously

Once inside, simply type in midori and this should bring the Midori browser as a window.
Note (Edited: 5 Feb, 2015): As of the latest Raspbian version (December 2014 release), Midori browser has been replaced by Epiphany Browser. You will get an error if you hit in midori. I’d recommend you hit in this command leafpad that will bring up the text editor instead.

We’ll now hit in lxsession or startlxde and that should pop up the desktop of the Raspberry Pi:

Have fun 🙂
In order to close this, go back to the PuTTY terminal and kill this process using Ctrl + C
Note: This for some reason is still not showing the lower part of the Desktop including Start menu and taskbar.
EDIT: The LXPanel that was missing was because of a messy config file in one of the image files. I’m able to see the LXPanel also on a clean image.
References:
- http://pihw.wordpress.com/guides/direct-network-connection
- http://www.straightrunning.com/XmingNotes/pixming.php
P.S: Did this post help you? Please leave your feedback. If you’ve tried some additional steps that helped you in getting this working, please share so we all can benefit from.
If you’ve benefited from this post, please consider donating and help me buy new development stuff and resources. Thanks!


I am facing the following problem
Connected SSH with raspberry pi 2 working fine
But when I try to connect RPI desktop (GUI) with lxsession command I could see the raspberry desktop on my laptop screen without taskbar and star button and when I use lxpanel command, I am able to see only taskbar and star button but other thinks like desktop, icons are not there, Could you please help me to solve the problem I have downloaded and installed the latest RASPBIAN Version: January 2015 and Release date: 2015-01-31
hi…may i knw why command lxsession and startlxde cannot work..blank desktop of raspberry pi appear..do i need to install anything?..thx in advance..^^
Yes, you need t install XMing and have it running before you type in those commands.
yes…i have install XMing and cannot run with those command..however, i can run with command startlxde-pi which i found it at the earlier post by MANI , 19 February 2015
Great. Are you using Pi 2?
i m using Raspberry pi B+ model. … Thanks for your tutorial.
Thanks 🙂 I hope you’ve used the latest Raspbian OS since the older ones work fine with the startlxde command.
hi…may i knw how to access home internet wifi with wifi dongle (not ethernet)…do i need to set the wifi configuration which located in raspberry pi’s desktop?
Yes. You need to use wpa_config within Raspberry Pi to configure it to connect it to Pi
after i setting up with this tutorial, then i connect ethernet cable between raspberry pi and wifi router,but no wifi connection…may i knw how to access wifi with this connection?
thank you dost. please keep on sharing. this post helps me exactly as per you explained.
Glad it helped. Spread the knowledge with your friends and help others whenever you get a chance 🙂
Hi Anwaarullah,
I’ve tried out your method and it is working, so great!
Got one question though. This is connecting the pi and the PC through Ethernet cable, and use the wireless connection on the PC’s side. Can we switch them over and use the Ethernet on the PC’s side, and connect the pi and the PC using wireless hotspot?
Interesting. In order to understand, why would you want the PC to use internet from the Pi which is connected to a WiFi network wirelessly?
I found this while searching for your answer: http://raspberrypi.stackexchange.com/questions/8610/sharing-internet-through-ethernet-port The linked answer is almost 6 years old for a Debian PC, though I’m hoping you can tinker with it to get it running on the Pi.
Sorry I didnt make it clear. I want to connect the PC to the internet using cable, and create a wireless hotspot on the PC, then make the Pi use this hotspot to connect to internet using a wifi dongle. In this way the Pi is not tied to the PC physically and I can move it around more easily.
I’ve done some search and tested a few times, but didn’t managed to get it work. The hotspot on the PC seems to be working not problem, but I don’t know how to configure the Pi to automatically connect to that hotspot. Do you have any clue where I should look at?
Thanks
Sorry. I got confused. Did you mean to say that you wanted to use the internet via Ethernet on PC and then share that to Raspberry Pi wirelessly? If Yes, it’s pretty simple 🙂
Configure your Laptop as a Virtual Hotspot and get the Pi to connect to this PC’s Virtual WiFi hotspot. In order to get the Pi automatically connect to this virtual WiFi hostspot of PC, I use a utility on Pi called as wicd-curses. Play around and let me know if that works.
And you’d need a USB WiFi Adapter on the Pi
Just saw your reply. Thanks I will have a look at wicd-curses.
You’d need to install it first before using:
sudo apt-get install wicd-curses
Hai brother,
I have followed your steps, but when i was trying to get Rasperi pi ip address file like this
the step no.8 Now, power off the Raspberry Pi and take out the SD Card. Plug in the SD card into a card reader and open it. You should see a couple of files.
but i cant see any files like that..so what can i do? can you help me
Are you not able to see any files on the SD card or not able to find cmdline.txt file?
Hi dear br,
i didnt get cmdline.txt files..
So no files at all in the SD Card? Did you flash it with Raspbian OS in the first place? Or NOOBS Image?
HI,
do u have any ideas?sir
Hello sir,
I have already done that one. in my SD card they have some files but i didnt get cmdline.tx file?
Hai,
I have flash it with Raspbian OS..
I’m wondering why you’re not able to see the cmdlie.txt file. Do you see config.txt file?
Hai,
i got cmdline.txt files. now i got another problem
my LAN ip is 169.254.16.58. and I set the ip for pi as 169.254.16.61
When i ping,i got the following result:
Pinging 169.254.16.61 with 32 bytes of data:
Reply from 169.254.16.58: Destination host unreachable.
Reply from 169.254.16.58: Destination host unreachable.
Reply from 169.254.16.58: Destination host unreachable.
Reply from 169.254.16.58: Destination host unreachable.
Ping statistics for 169.254.16.61
Packets: Sent = 4, Received = 4, Lost = 0 (0% loss),
why its ping from 169.254.16.58? can you help me? sir
Hai,
did you see my previous post? any help?
After you got those ping errors, did you go back and make sure that the Obtain IP Automatically setting is still enabled in the network adaptor settings?
Hello sir,
sorry for late reply. I have checked after i got ping error. that is still enabled for network settings – IP address automatically.
I dont know why i can not ping? can you help me sir?
my LAN ip is 169.254.16.58
and I have changed my Rasperi pi IP is 169.254.16.61.
but i can not connect. can you please help me? sir
Hello sir,
did you got my previous post? any ideas? help me sir?
Hello sir,
Hello sir,
sorry for late reply. I have checked after i got ping error. that is still enabled for network settings – IP address automatically.
I dont know why i can not ping? can you help me sir?
my LAN ip is 169.254.16.58
and I have changed my Rasperi pi IP is 169.254.16.61.
but i can not connect. can you please help me? sir
Hello sir,
do you have any idea about my previous problem ? did you got ?
can you help me?
Were you firstly able to get SSH access to the Pi?
Hi,
no i can not access ssh. what to do?
Hi,
I have installed Windows 10 IoT core tools on the sd card of my raspberry-pi2.
Now I am unable to make a headless setup.When I connected to an external monitor it is working fine.But I need the display to be on my PC screen.Please help me.
Thank You.
I haven’t tried it with Win IoT Core yet ( as I don’t have Win 10 on my PC). I’m kinda clueless here.
Hello Anwaarullah
I have an issue of establishing internet connection.
Basically followed every step made by you but simply can’t get internet connection
Here is my forum post on raspberry pi forums
https://www.raspberrypi.org/forums/viewtopic.php?f=28&t=120295&p=813818#p813818
Hopefully you can help out
Any luck with that yet? All looks good to me. Are you sure that the Obtain IP Automatically radio button is still selected after you share the connections with each other in the Network settings?
Hey, I can access the desktop mode but the sreen resolution is twice of my laptop resolution and I am not able to adjust it, and can’t even found menu bar from Raspberry.
Will you please help?
To get the menu bar, can you try using “start lxpanel” command?
C:\Users\Muhammad>ping 169.254.189.199
Pinging 169.254.189.199 with 32 bytes of data:
Reply from 169.254.189.197: Destination host unreachable.
Reply from 169.254.189.197: Destination host unreachable.
Reply from 169.254.189.197: Destination host unreachable.
Reply from 169.254.189.197: Destination host unreachable.
Ping statistics for 169.254.189.199:
Packets: Sent = 4, Received = 4, Lost = 0 (0% loss),
Assalam u Alaikum..First time i used it..it was working fine..but now it is giving this error..kindly help me
Wa Alaikum As Salaam. Has your PC’s IP changed? And did you configure with respect to the PCs IP after you turned on the ‘Obtain IP Automatically’ option?
Thanks a lot. It worked!
Cool. Glad it helped 🙂
i don’t know why but the ip of my ethernet is 169.254.31(from ipconfig) and from my pi it is 169.254.155.58 (when i use that ip from putty it works fine but still i can’t share internet)and when i change in cmdline.txt it doesn’t affect anything and i can’t share my internet connection to my pi through ethernet cable.
hello sir!I am doing a project with raspberry pi and i need headless setup of rasp pi. i have raspberry jessie-lite os written on sd card. I got the response from pi correctly in cmd windows.But, when I try to ssh into it ,I am getting error”Network error:connection refused”. what is the problem?
Before coming to here, i followed another tutorial in which i was able to ssh,but when hit command “startlxde”, i got response like “-bash startlxde:command not found”.Help me for this problem also if you know! i need the solution very urgent. your help at the right time would be much appreciated.
As discussed over email, Jessie Lite doesn’t have the X Server installed and hence the errors.
Thank you for this information….i did same thing but it can ping ip address and it can work properly but when i was use midori or leafpad, and lxsession or startlxde…it can not… please see that following results…
(pi@raspberrypi:~ $ midori
-bash: midori: command not found
pi@raspberrypi:~ $ Midori
-bash: Midori: command not found
pi@raspberrypi:~ $ leafpad
-bash: leafpad: command not found
pi@raspberrypi:~ $ lxsession
-bash: lxsession: command not found )
….so i dont know why raspberry pi display not open and why it show like this??…. i want to know how to rectify this problem??….kindly give some solution…..
comments: this method works on Pi3 with windows10. tested on 20170119
Thank you for confirming (y)
Thanks for the above information but when I followed the same procedure i got struck at the point to ping the raspberry pi to the laptop and the details i got is below
:\WINDOWS\system32>ping 169.254.175.238
Pinging 169.254.175.238 with 32 bytes of data:
Reply from 169.254.179.235: Destination host unreachable.
Reply from 169.254.179.235: Destination host unreachable.
Reply from 169.254.179.235: Destination host unreachable.
Reply from 169.254.179.235: Destination host unreachable.
Ping statistics for 169.254.175.238:
Packets: Sent = 4, Received = 4, Lost = 0 (0% loss),
Is there any solution to solve the above problem? If so please tell the details.
There are 2 more methods mentioned on this post: https://anwaarullah.wordpress.com/2013/08/12/sharing-wifi-internet-connection-with-raspberry-pi-through-lanethernet-headless-mode/
Try those out and let us how it goes.